Diagnosing and disabling bugged CPU cores
Yesterday my CPU died: constant reboots, BSODs, freezes, etc. Usually I would buy new hardware, but I couldn’t waste time with that just yet, so I managed to find out what exactly was failing and how to avoid it. Most people won’t bother with this kind of stuff, but I thought I should document the process I followed; it might be of help to someone, some day.
Disclaimer: I’m stuck with Windows OS for various reasons, so if you use any of the OS master races, half of this stuff will be useless I’m afraid.
- First of all, make sure the reboots are due to CPU issues. For that, follow the usual procedure: unplug all devices you don’t need, test your ram, yada yada

- Download prime95, open it, choose 1 torture test thread, choose Small FFTs option, and don’t click “OK” just yet (or you risk an insta-BSOD)
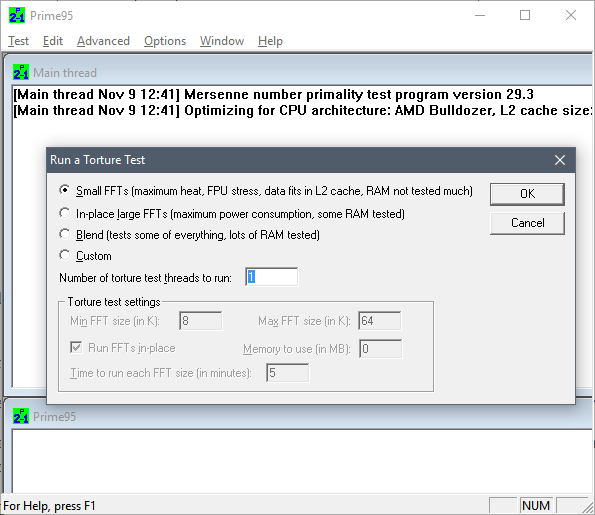
- Go to task manager, click More details, go to Details tab, locate and right click on prime95 process, click “Set affinity”, uncheck all CPUs except the first one.

- Go back to prime95, click OK to start the test on that one core. Let it run for 5 minutes. If any numeric error or warning message shows up, it freezes, it ends in BSOD, etc, then that core is probably busted.
- Repeat the test choosing different affinities, this will test a different core each time.
- After that, I would also test pairs of cores. Hyperthreading, shared-FPUs, shared L2, heat dissipation problems, etc, can all lead to failures only when several cores are used at the same time.For that, your best bet is to test with affinity set to consecutive pairs of cores, and then adjusting the number of threads in prime95 accordingly.
In my case, this yielded problems in the 5th and 6th core (always failing when used in conjunction, and rarely when run in isolation). I would bet the problem is their shared FPU path, but I have no idea how to find out for sure.
Once you have determined the failing core or cores, you can survive without a new CPU this way:
- If your BIOS allows it, look for the option to selectively disable cores. My mobo allows disabling pairs of cores rather than individual ones, but that was okay in my case, since I had to nuke one of those pairs.
- If that’s not possible, hit Win+R, run msconfig, go to Boot tab, click Advanced Options, mark “Number of processors”, and choose the appropriate amount. You will probably lose some working cores, but it’s something ¯\_(ツ)_/¯
And of course, if you can afford the wait, just throw that CPU away and buy new parts. Otherwise your CPU will be limping around… and the rest of cores are likely to follow the same path anyway.
Presentación GIT & GIT-SVN
Aprovechando la coyuntura, publico también unas transpas de una charla que dimos hace mil en la oficina, esta vez en spanish. Estaba orientado a novatos totales del git, pero familiarizados con svn:
07.5.14Grokking Git in 8 slides (for svn users)
Made this at work, it’s how I would have liked to learn Git when I started toying with it some years ago.
Note that not a single Git command is explained. Instead, a series of images show how Git works, and what’s possible to do with it.
Looking up the actual (and unintuitive) commands and flags is left as an exercise to the reader 🙂
IMPORTANT: the presentation notes are only visible in the original Grokking Git presentation (bottom panel, right below each slide), but here’s an embedded version anyway, for those too lazy to click the link:
02.1.14Hacking the LGA 775 socket
Hello, and welcome to CPU Dealers!
In todays episode we’re going to learn how to fit an LGA771 CPU into an LGA775 motherboard with no brute force!
Motivation
So why on earth would anyone decide to put an LGA771 Xeon server cpu into a domestic LGA775 motherboard, you may ask?
Welp, because it’s fun and you get to learn stuff, thats why!
Traditional motivation: Money
However, the usual argument is that, if you are planning a modest upgrade for your shitty old LGA775 system, not needing the latest and greatest, you can save some money this way. See, there’s lots of Xeon processors in the market right now, and they are all dirt cheap. The interesting thing is that most LGA775 CPUs have Xeons equivalents:

The Xeon I chose, an E5440 SLBBJ. Same speed as a Q9550, but requires less juice, so has a lower TDP. Source: here and there.
Some people argue that Intel simply bins Xeons better than the consumer counterparts, so while being essentially the same CPU, the Xeons are more reliable, run colder, and are harder, better, faster, stronger.
The LGA775 market, on the other hand, is filled with pretty expensive CPUs. They’re all usually priced 30€ to 150€ higher than the server versions: Xeons are definitely the best bang for the buck. So the plan usually is:
- Upgrade your system to a Xeon instead of a domestic CPU.
- …
- Fun and profit!
Side motivation: Overclocking
Some people take advantage of the lower voltages required by Xeons, and choose them not only because they’re cheaper, but because it’s in theory easier to squeeze a bit more speed out of them.
Keeping that in mind, I chose an E0 stepping (later revisions usually lower power requirements of the CPU). Unfortunately, my SLBBJ unit was already running pretty hot at stock voltages and clocks, so I’m leaving it alone for the time being.
Background
LGA775 (codenamed Socket T) was introduced by Intel around mid-2004, and used in domestic motherboards. The most popular CPUs running those LGAs are now Core2Duos and Core2Quads.
A year and a half later, in 2006, Intel introduced LGA771, a very similar LGA intended for use in multiprocessor server motherboards, and which can host Intel Xeon processors.
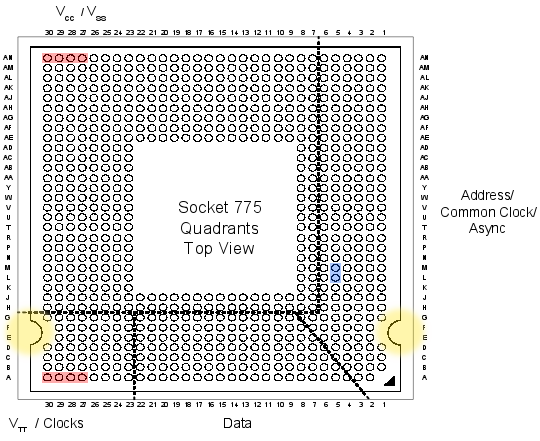
Looking at the official datasheets released by Intel (page 41 here and page 52 here) , we can check the pinouts of both LGAs, and spot their differences:
If we checked the socket pin assignment one by one, we could see that there’s 76 different pins in total. But most of them are irrelevant (reserved for future uses, etc), they pose no problem for our conversion mod, so we’re left wondering about the colored pins:
- Red: 8 pins only used in LGA775.
- Green: 4 pins only used in LGA771.
The red and green pins are all power pins (VCC, VSS at the top, and VTT at the bottom). There’s hundreds more of them in the LGA, so I’m sure our new CPU won’t mind if we remove just these few.
- Blue: 2 pins that have different purposes in each LGA.
These pins (L5 and M5) serve different purposes in LGA775 than in LGA771. And this time they are important pins (one of them is the Execute BIST pin, Built-In Selft Test, needed to boot). Fortunately, Intel had simply swapped their places in the newer 771 LGA! So it should be relatively easy to re-wire them.
- Yellow: not a pin, just highlighting the different shapes 🙂
These differing yellow shapes can be a problem, since the CPUs from one LGA will not physically fit in the other LGA without some hardware modifications. We’ll get to this later on.
Uh, in case you’re wondering, I did not personally go over all the pin specifications one by one. But this guy did.
Motherboard support
In most cases, the CPU will run as-is. This was the case of my 965P-DS3 motherboard.
Sometimes, you may need to manually patch your BIOS, adding the microcode of your specific Xeon model to the internal “whitelist” (so to speak). Additionally, this usually forces your mobo to acknowledge that your Xeon CPU implements the SSE4 instruction set (which can give an extra speed boost in some applications).
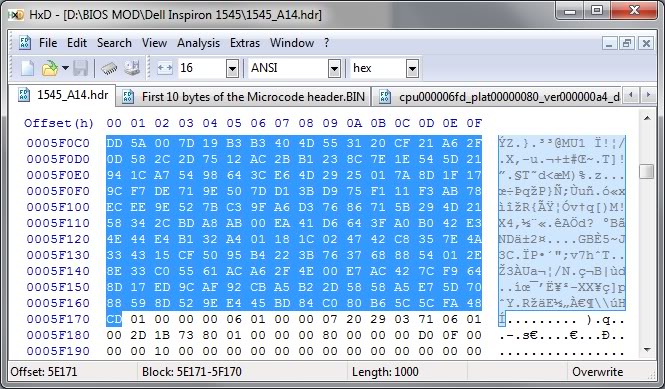
I didn’t patch my BIOS just yet… so instead, I decided to steal this screenshot from Google Images. Sue me.
And in a few rare cases, your motherboard will directly refuse to boot the new CPU, regardless of any BIOS patching you may attempt. In that case, you’re out of luck.
Before attempting to transform your LGA775, search the web and check if your chipset will be happy with a Xeon CPU.
In any case, bear in mind that your mobo needs to support the speeds that your specific Xeon choice requires: voltage, FSB speeds, etc. Otherwise you’ll have to resort to underclocking the CPU (sad), or to overclocking your motherboard/ram (yay! but not recommended).
Procedure
First, open your tower, remove the heatsink, then the CPU:
Now we do what the title says: we hack the LGA775 socket. Literally.
Yes, take a sharp knife or a cutter, and prepare to slash some plastic. The exact bits you have to cut off are the ones colored yellow in the LGA775 pinout diagram (scroll back to the beginning of this post). It should end up looking something like this:
The motherboard is ready!
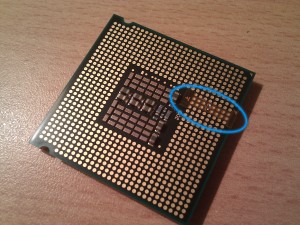
Now we need to hack the Xeon CPU itself. Remember the blue pins that had switched places in LGA771? It’s time to revert what Intel did, and get a 775-compatible pinout layout.
If you’re good enough you could try to swap them yourself, using whatever technique you come up with. But the rest of us mortals will resort to buying a ready to use swapper sticker. Search for “775 771 mod” in ebay, play safe and buy several of them, just in case you break one in the process:
So there’s that. Now we simply have to put the Xeon in the LGA, add thermal paste, heatsink, etc:
Finally, plug the PSU, pray to Flying Spaghetti Monster, and boot the system!
Results
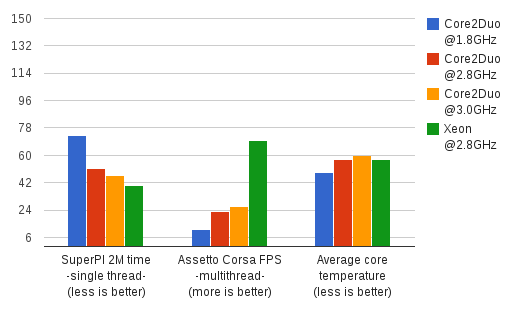
Here’s a nice comparison graph of the results. The contenders are:
- A Core2Duo E4300 (LGA775), at speeds ranging from 1.8GHz (stock) up to 3.01GHz (overclocked).
- A Xeon E5440 (LGA771), at stock speed (2.83GHz).
The benchmarks are:
- Assetto Corsa, a multithreaded racing simulator (M30 Gr.A Special Event), FPS measured with my own plugin FramerateWatcher.
- PI calculator SuperPI, 2M variant, running in a single thread.
- Average maximum temperature reached by all cores, over a period of 15 minutes running In-place large FFTs torture test in Prime95.
The winner is the Xeon, as it should: specially in multithreaded programs, the Xeon obliterates the Core2Duo.
But it’s interesting to note that, even running at the same clock speed of around 2.8GHz, the Xeon outperforms the Core2Duo by more than 20% in single threaded applications.
I checked the FSB and RAM multipliers in both cases, just in case the Xeon had an advantage on that front, but it was actually the E4300 which had higher FSB and RAM clocks!
Goes to show how clock isn’t everything when it comes to performance, and obviously better CPU technology consists of more than higher clock freq and greater number of cores.
The end
So that’s it, that’s the story of how I more than doubled the framerates in games and halved compilation times for the cost of 4 movie tickets.
Hope you enjoyed reading this article as much as I definitely did not enjoy proof-reading it! 😉
08.7.13In defense of unformatted source code – breakindent for vim
Everyone knows that Opera is better than Firefox, Vim+Bash is better than any IDE, and 4-space indenting is better than tabulators. Having established those undisputed facts of life, let’s revisit some common fuel for flame wars: the mighty 80 character line limit.

Fortran code punched into a 80 x 10 IBM Card from 1928
Some people propose 80 chars, others 79, 100, 120, 132 , and many values in between.
Some people propose it should be a soft limit (meaning you can freely ignore in rare cases), while others set pre-commit hooks to stop any infringing line from reaching repositories.
None of this really matters.
The 80 character line limit, originated by hardware limits back when computer terminals were only 80 chars wide, or even further back in time, is said to provide many advantages. To name a few:
- Better readability when opening two files side by side (for example, a diff)
- Quicker to read (same reason why newspapers use many columns of text, instead of page-wide paragraphs: human brain scans text faster that way).
- It forces you to extract code into separate functions, in order to avoid too many nesting levels.
- It prevents you from choosing overly long symbol names, which hurt readability.
- Etc.
I propose that those advantages are real and desirable, but should not be achieved through arbitrary line length limits. On the contrary, I propose that coders should not waste time formatting their source code: their tools should do it when possible. After all, we use text editors, not word processors! The problem is that, unfortunately, most text editors are too dumb.
Fix the editors, and you fix the need for line length limits.
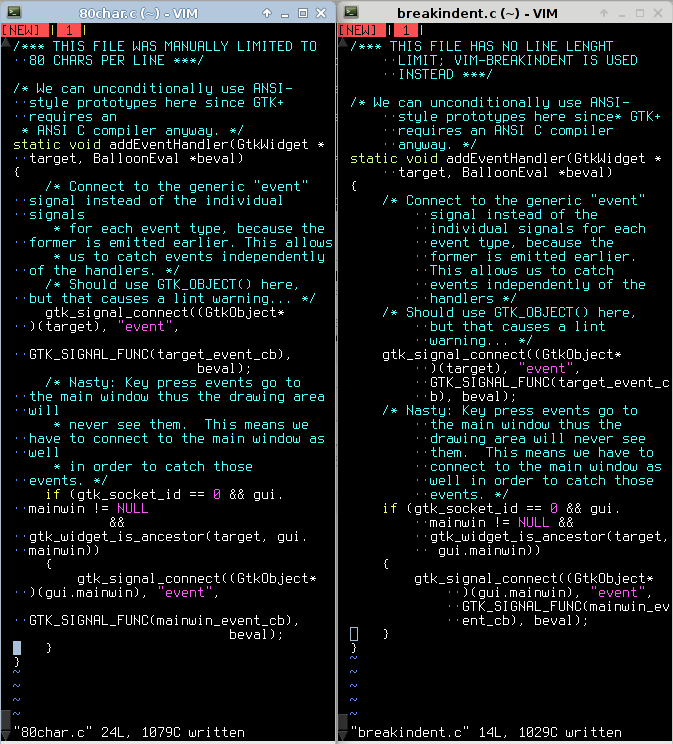
If you edit your code in vim, you’re in luck, thanks to the Breakindent functionality. Here’s some side-by-side comparisons of 80-char line limit vs. unformatted text with BreakIndent enabled:
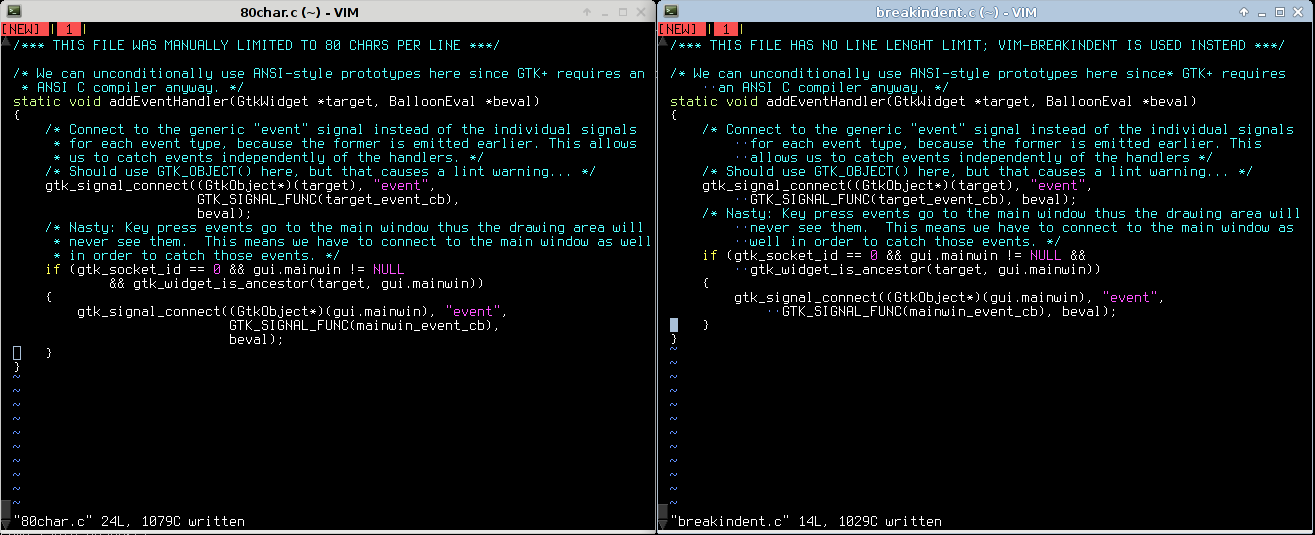
(left: 80-char right: breakindent)
Traditional terminal size:
Resizing your terminal to exactly 80 chars wide, both cases look pretty similar. Nothing to see here, move along.
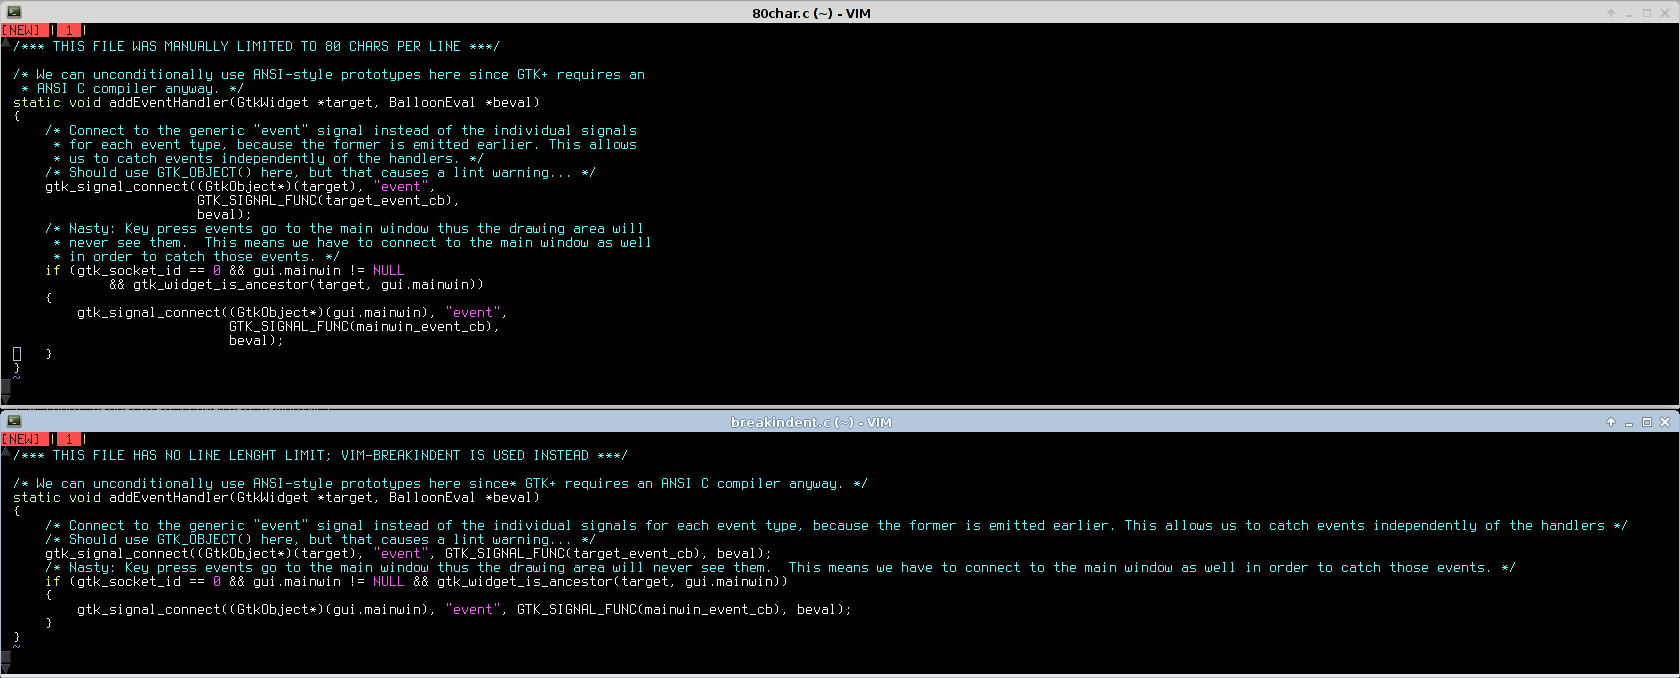
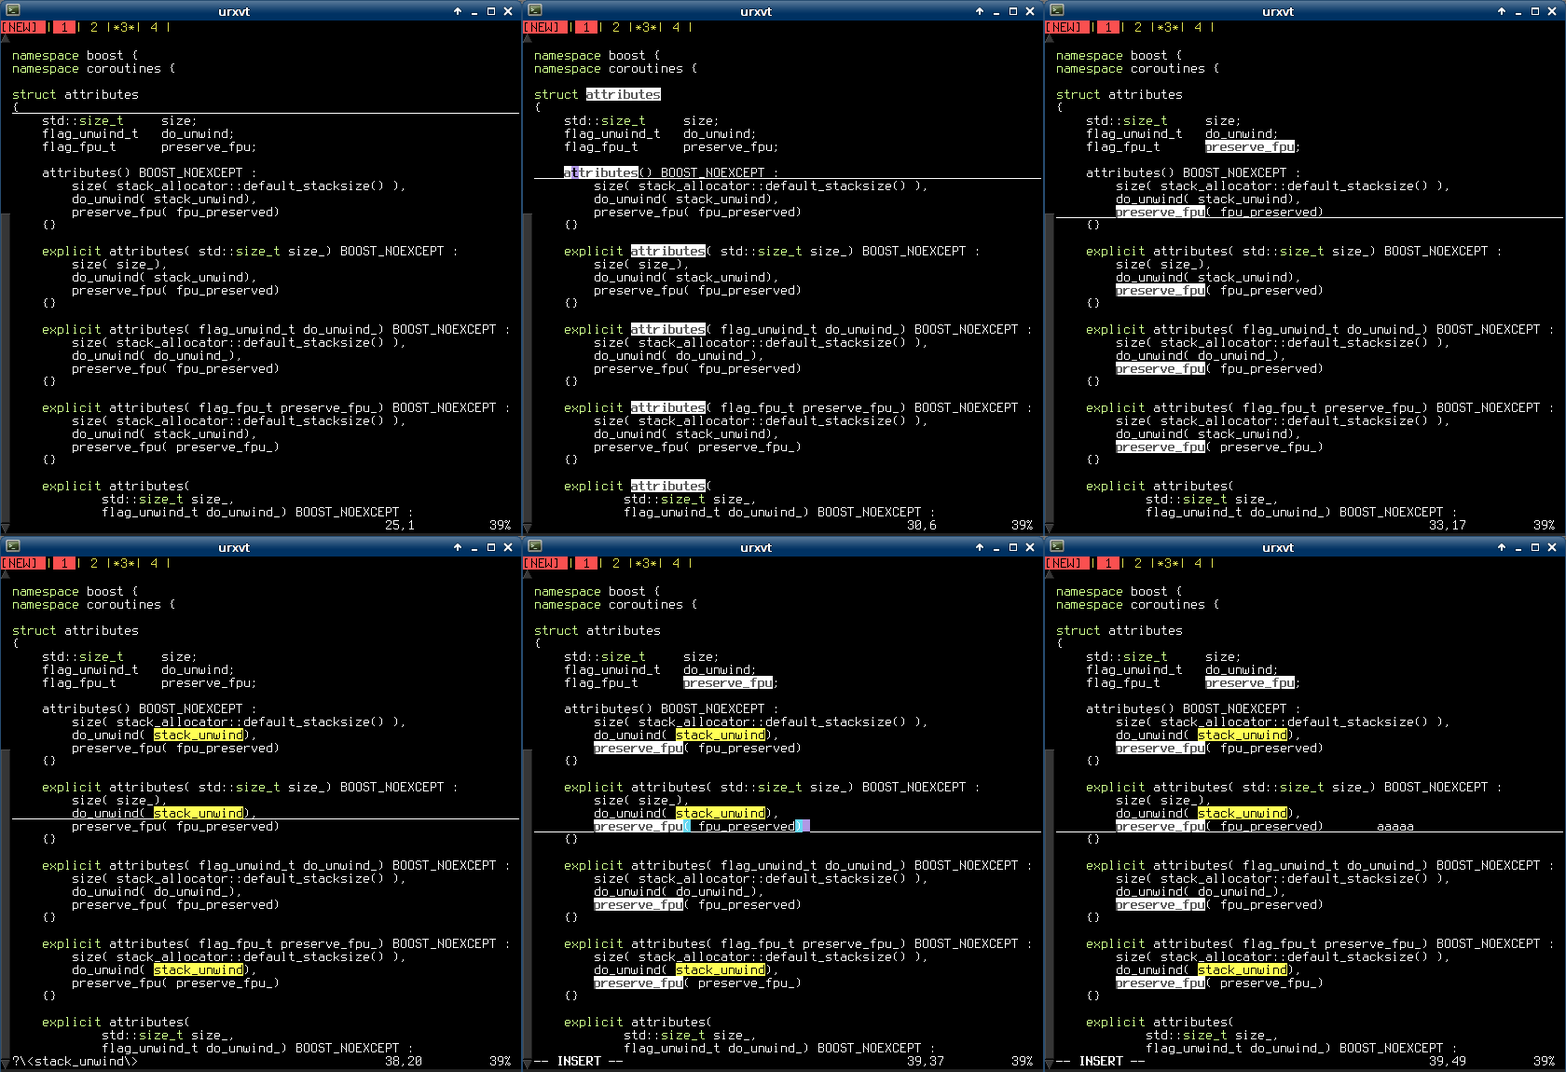
(top: 80-char bottom: breakindent)
Wide terminal:
If you want to edit just one file, an 80-char limit will waste the rightmost half of your screen (or more).
All in all: when compared to an editor featuring smart indenting, the 80-char lines artificially limit how you can resize your own windows, with no appreciable gain, and in most cases forcing you to waste many pixels of your carefully chosen 27″ dual-screen coding setup.
05.17.13Trick of the day: rendering graphics in your terminal
“Those who cannot remember the past are condemned to repeat it”
— Jorge Agustín Nicolás Ruiz de Santayana y Borrás
Over the past few years, a number of “graphic terminal” emulator software have emerged. Some examples:
This is nothing new, in fact it was possible back in the 70’s, and you can try it using XTerm, the default terminal emulator bundled with X installations since forever!
The process is very simple, you simply have to run:
$ xterm -t -tn tek4014
Which will start an xterm emulating a TEK4014 terminal (instead of the default VTxxx plain-text terminal).
Now we’ll download some images we want to display. These 40 year old terminals don’t support JPEG though (it didn’t exist back then), nor any popular modern image format, so we’ll have to provide images in a format they understand. Plotutils includes a couple of these vectorial images, so we will run:
# apt-get install plotutils
And finally it’s simply a matter of feeding the Tek4014 terminal with an image, for example:
$ zcat /usr/share/doc/plotutils/tek2plot/dmerc.tek.gz
The terminal will be fed with an appropriate escape character sequence, along with the actual image contents, it’ll interpret it as an image (just like other escape sequences are interpreted as colored or underlined text), and the awesome result will be this:
How cool is that? 🙂
You can even resize the terminal window, and the graphics will be re-rendered with the correct size (remember it’s a vectorial image, so wen can zoom in indefinitely).
01.31.13
Helpful VIM highlighting
Here’s a quick snippet that you can add to your .vimrc in order to get:
- MS Visual Studio-like ‘current word‘ highlighting.
- Trailing space highlighting.
The result looks like this:
And the code is:
function Matches()
    highlight curword ctermbg=white ctermfg=black cterm=bold gui=bold guibg=darkgrey
    try
        call matchdelete(w:lastmatch)
        unlet w:lastmatch
    catch
    endtry
    silent! let w:lastmatch=matchadd ('curword', printf('\V\<%s\>', escape(expand(''), '/\')), -1)
    highlight eolspace ctermbg=red guibg=red
    2match eolspace /\s\+$/
endfunction
au CursorMoved * exe 'call Matches()'
Yes, one day I might convert it to a vim plugin, meanwhile just copy-paste to your .vimrc.
Enjoy!
12.3.12HTML5 + Box2D = Quick’N’Dirty Dakar Rally Sim
I very rarely mess with web development these days, but the power of current JavaScript engines and latest HTML5 features were just too juicy to pass on.
So sometime around early 2011, I took two afternoons and played with these technologies. Just now I remembered the project I had in hands, and decided I could give it a name and publish it on the net for your personal amusement.
Consider it pre-alpha, and expect bugs! 🙂
Features:
- Infinite landscape, using procedural generation (how else could I squeeze infinity into a few KBs?), and adaptive terrain features based on play style (namely, how fast you like to drive).
- Somewhat realistic physics (based on Box2dJS library).
- Incredibly detailed graphics engine based on WebGL. Nah just kidding, it’s the default HTML5 canvas-based rendering provided by Box2D itself…
- Physically-modelled rolling stones on the driving surface. Framerate suffers too much so they’re disabled by default. To re-enable, dive in the source code and hack away.
- Tested on major PC browsers, and on Dolphin Browser Mini on Android.
Controls:
- right-arrow -> gas
- left-arrow <- brake
Right now I’m in the middle of a physical home migration so the code is not githubbed yet, but you can access it by clicking the following link:
Quick’N’Dirty Darkar Rally Sim 2011
There’s no purpose as of yet, but you can try to race against the terrain and see how far you last before ending up on your roof or suffering a physics explosion.
License is GPLv3.
10.24.12Liberación de recursos en python
Hurrah! Ya no hay que hacer mallocs, ni deletes, ni tener destructores, ni hostias en vinagre, porque python lo hace todo!
f = open("foo.txt", "r")
text = f.readlines()
f.close()        # WAT.
with open("foo.txt", "r") as f: # WAT.
    text = f.readlines()
Y no hablo solo de ficheros, sino cualquier tipo de recurso: conexiones de red, puertos hardware, primitivas de sincronización, memoría RAM, etc.
(nota: el texto a continuación es básicamente un copiapega de un mail enviado a una lista de correo privada. lo digo por si algo no encajara…)
Vamos a meternos en detalles (al menos hasta donde yo conozco; y no dudeis en corregirme si veis algún fallo, así aprendemos todos):
No es necesario hacer un close:
Es cierto, no es estrictamente necesario hacer un close, porque por defecto el lenguaje python se encarga de esas tareas mundanas por nosotros. El problema es que lo hace automáticamente, y a su manera, y puede que no sea la que nos interese.
De ahí que se suela hacer un close() explícito (ya sea con una llamada directa, o mediante el “with” que he comentado antes).
¿Por qué podría no interesarnos lo que hace python por defecto?
Puede ser por muchos motivos:
La vida de las variables en python es un detalle de implementación:
Por ejemplo, el intérprete que solemos usar (CPython) mantiene los objetos en memoria como mínimo hasta que salen de ámbito, y como máximo hasta cuando el GC de CPython lo determina en alguna de sus pasadas (cuando existen ciclos de referencias, y según el perfil de uso de memoria de nuestro programa).
En cristiano: que una variable que se sale de ámbito, podría eliminarse al momento, o podría tardar media hora en ser eliminada por el GC. Imaginad que las conexiones a una misma cámara IP solo se cierran cada diez minutos (porque hemos delegado todo al GC), y que esa cámara acepta como máximo 4 conexiones simultáneas…
(otras implementaciones como PyPy, Jython, IronPython, etc. pueden comportarse distinto)
En .NET ocurre lo mismo, como bien dice David (de ahí viene el jaleo de usar iDisposables incluso para recursos managed…), y en Java más de lo mismo.
Bugs de terceras partes:
Alguna vez hemos sufrido bugs de conteo de referencias, por alguna librería de python escrita en C que no actualizaba correctamente los conteos y provocaba leaks de nuestros propios objetos.
Si esos objetos tenian recursos abiertos, hay que cerrarlos a mano, o sino seguirán abiertos hasta que muera nuestro proceso de python.
Bugs propios:
Incluso asumiendo una gestión de memoria perfecta e instantánea por parte de CPython (que no es el caso necesariamente, como he explicado), existen casos en que nuestro código puede estar manteniendo variables en memoria (y con recursos abiertos) sin que nos demos cuenta.
Algunos casos típicos:
Variables de instancia:
def __init__(self):
    self.my_file = open(...)
    print self.my_file.readline()
    # el recurso permanecerá abierto al menos
    # hasta que el objeto self sea eliminado
Variables dentro de una función de larga duración:
my_file = open(...);
print my_file.readline()
while True:
    # bucle principal del programa
    # my_file sigue con el recurso abierto al
    # menos hasta el fin de la función
Variables que por su naturaleza son compartidas:
mutex. También semáforos, bufferes de memoria compartidos por varios hilos, etc.Variables referenciadas por closures:
def my_function():
    my_file = open("foobar")
    def internal_function():
        return my_file.readline()
    return internal_function
my_closure = my_function()
# my_file sigue existiendo y con el archivo
# abierto, hasta que se destruya my_closure
Ámbito de función, no de bloque:
for), porque su ámbito es siempre de función:for path in ["/a.txt", "b.txt"]: my_file = fopen(path...) print my_file.readline() print path # va a imprimir "b.txt", aunque # estemos fuera del bucle. print my_file # lo mismo pasa con my_file, aunque # pueda ser anti-intuitivo del my_file # si queremos que se elimine esta # referencia a la variable, y el GC # pueda hacer su trabajo en algún # momento indeterminadowhile True: #bucle principal de duración infinita
Software steadicam – Or how to fix bad cameramen
So you’ve just come back from vacations (wohoo), having filled 10 gigs of photos and video, only to discover you’re a (let’s be honest here) shitty cameraman without your tripod?
Fret not, for this article will show you the secret to solve your problems!
In an ideal world, your hands are as steady as a rock, and you get Hollywood quality takes. In the real world, however, your clumsy hands could use a hand (hah!).
So here’s your two main options:
Hardware solution (for use while filming)
This is the proper solution: a system that will compensate for the vibration of your shaky hands and the movement of your body while walking – not unlike the springs on your car allow for a pretty comfortable ride through all sorts of bumps.
Ideally, it will compensate for all the 6 axis (3D traslation + 3D rotation), but in practice you may be limited to less than that. Unfortunately (for most), this depends on how deep your pockets are (buying a ready-to-use steadicam, ranging from 100 bucks to several thousand), or on how handy you are with your toolbox (building a home-built equivalent).
The result could (in theory) be similar to this:
(ah, yeah… a segway, minor detail)
Software solution (for use after filming):
If you can’t spare a segway + a steadycam backpack, there are affordable alternatives. And if you already have many shaking, blurry videos lying on your hard disk, then this is your only option!
We’ll rely on PC software to fix those videos. This, you can do for free at home. There are some payware software packages that may produce slightly better results: but what I’m going to show you is freeware, very quick to use, and good enough quality for most purposes.
The software method may not be that good when compared to an actual steadicam, but hey, it’s better than nothing!
The steps:
I’m not going to go much into details, so here’s the basics.
- Download VirtualDUB, an open source and free video editing software.
(Make sure you can open your videos. E.g. you may need to install the ffdshow-tryout codecs and set them up, or whatever; Google is your friend! 🙂 ) - Once you can open your videos, you have to download the magic piece of the puzzle: Deshaker.
(This free tool – though unfortunately not open source – will do all the important work) - Now open your video, add the Deshaker video filter, choosing “Pass 1“.
(If you have a rolling shutter camera (most likely), and know its speed (unlikely), you can also correct it by entering the necessary values in there) - Click OK, and play the video through.
(This will gather information about motion vectors and similar stuff, in order to find out how to correct the shaking, if present) - Now edit the Deshaker video filter settings again, and choose “Pass 2“. Tweak settings at will, and click OK.
(A progress window will be visible for just a few moments) - Finally, export the resulting video, and you’re good to go!
For a more detailed guide (including rolling shutter values for some cameras), just read the official Deshaker page, or browse Youtube; there’re some tutorials there too.
The settings basically tune the detection of camera movement, as well as what method will deal with the parts of the image that are left empty after deshaking.
The results:
The video below is an example I’ve cooked for you. Each of the 3 processed videos uses a different combination of settings, and was created in no more than 20 minutes each.
I sticked them all together for your viewing pleasure. The improvement can be easily appreciated!
That’s it. Happy filming! 8)
Bonus track
If you insist on using hardware solutions (good!), here’s a neat little trick that’ll allow some smooth panning (provided you’re not walking):


