


Diagnosing and disabling bugged CPU cores
Yesterday my CPU died: constant reboots, BSODs, freezes, etc. Usually I would buy new hardware, but I couldn’t waste time with that just yet, so I managed to find out what exactly was failing and how to avoid it. Most people won’t bother with this kind of stuff, but I thought I should document the process I followed; it might be of help to someone, some day.
Disclaimer: I’m stuck with Windows OS for various reasons, so if you use any of the OS master races, half of this stuff will be useless I’m afraid.
- First of all, make sure the reboots are due to CPU issues. For that, follow the usual procedure: unplug all devices you don’t need, test your ram, yada yada

- Download prime95, open it, choose 1 torture test thread, choose Small FFTs option, and don’t click “OK” just yet (or you risk an insta-BSOD)
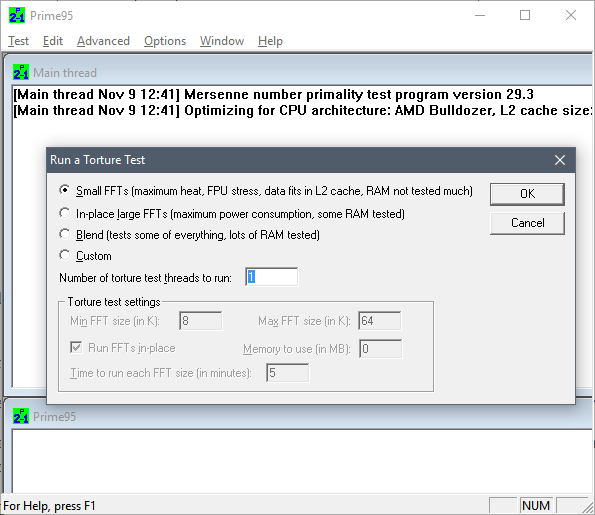
- Go to task manager, click More details, go to Details tab, locate and right click on prime95 process, click “Set affinity”, uncheck all CPUs except the first one.

- Go back to prime95, click OK to start the test on that one core. Let it run for 5 minutes. If any numeric error or warning message shows up, it freezes, it ends in BSOD, etc, then that core is probably busted.
- Repeat the test choosing different affinities, this will test a different core each time.
- After that, I would also test pairs of cores. Hyperthreading, shared-FPUs, shared L2, heat dissipation problems, etc, can all lead to failures only when several cores are used at the same time.For that, your best bet is to test with affinity set to consecutive pairs of cores, and then adjusting the number of threads in prime95 accordingly.
In my case, this yielded problems in the 5th and 6th core (always failing when used in conjunction, and rarely when run in isolation). I would bet the problem is their shared FPU path, but I have no idea how to find out for sure.
Once you have determined the failing core or cores, you can survive without a new CPU this way:
- If your BIOS allows it, look for the option to selectively disable cores. My mobo allows disabling pairs of cores rather than individual ones, but that was okay in my case, since I had to nuke one of those pairs.
- If that’s not possible, hit Win+R, run msconfig, go to Boot tab, click Advanced Options, mark “Number of processors”, and choose the appropriate amount. You will probably lose some working cores, but it’s something ¯\_(ツ)_/¯
And of course, if you can afford the wait, just throw that CPU away and buy new parts. Otherwise your CPU will be limping around… and the rest of cores are likely to follow the same path anyway.
Track Tour Episode 1: Circuit de Spa-Francorchamps (1967 edition)
Last year I went on a business road trip to Germany. On the way back I quickly stopped by several classic tracks close to my return route (some of them now partially or fully abandoned).
One of them, as you may have guessed by the title, was the belgian track of Spa-Francorchamps.
I wanted to make a quick comparison video of some race simulators to the real thing. So here I am, months later, having finally decided it’s about time I learn how to edit videos. I initially tried the open source software OpenShot. Unfortunately, I found too many bugs related to speed adjustment, which was absolutely required to synchronize my driving with the fastest F1 replay.
Eventually, I had to settle with the non-free non-opensource DaVinci Resolve:
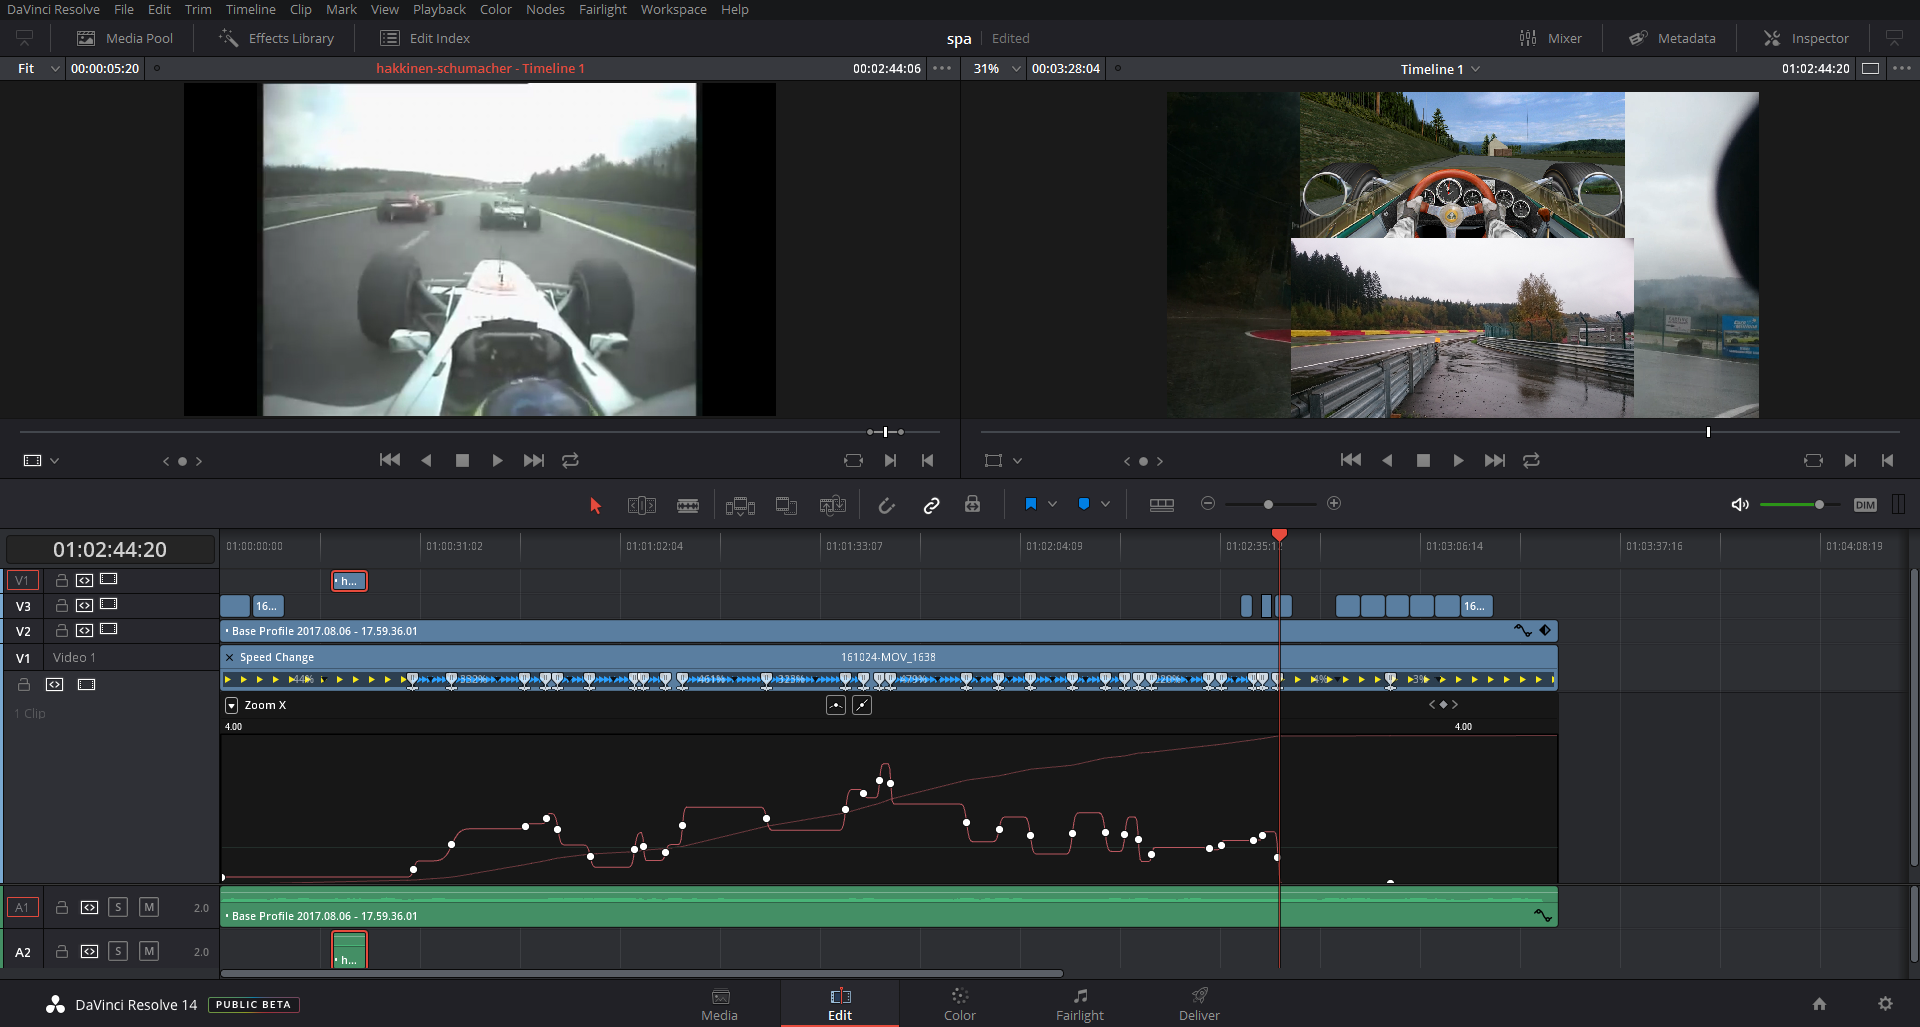
To create the subtitles I used Subtitle Edit. I guess I could have used Youtube’s built-in subtitle editor too.
And here’s the resulting video.
It could definitely be improved, but I’ve ran out of Sunday afternoon already:
11.16.16VR Showdown – Quick review of 11 headsets
Disclaimer: this is not meant to be an in-depth review of any of them. I have actually spent a very limited amount of time in many of them, so a rushed calibration/setup may have lead to incorrect conclusions. Don’t hate me please 😀
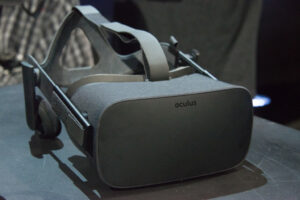
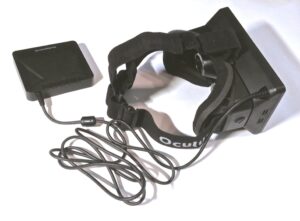 Oculus Rift DK1
A promising product showing what’s possible with current technology, albeit with lots of flaws, as expected in such an early device: screen door effect everywhere, no positional tracking, bit uncomfortable to wear, very low resolution.
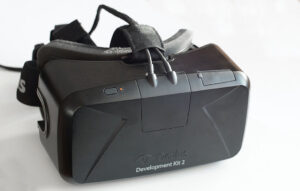 Oculus Rift DK2
Already more than 2 years old, but still benefits from the latest Oculus software updates. Low persistency screen, reduced screendoor effect and higher refresh rates makes it the first and cheapest one to be really usable on a daily basis.
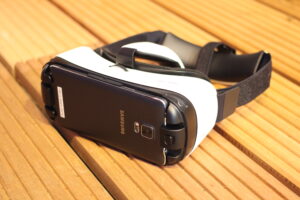 Samsung Gear VR
Only rotational tracking. Visually on par with the modern desktop headsets. First high quality VR headset for smartphones.
 Oculus Rift CV1
Benefits from the best device drivers out there right now (async spacewarp reduces requirements down to 45FPS). One of the highest image quality when taking into account their lense design (when ignoring the god rays), and very comfortable for long sessions.
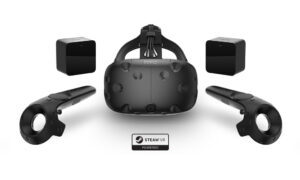 HTC Vive
Similar overall quality as CV1, usually considered a bit less comfortable, but providing room-scale VR before anyone else did, along with proper VR controllers rather than a lousy gamepad.
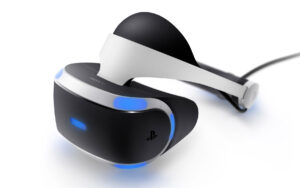 PlayStation VR
Oh god, the tracking wobbles so much compared to Vive/Rift. Probably up to one centimeter at times. But it’s so cheap compared to the proper VR headsets.
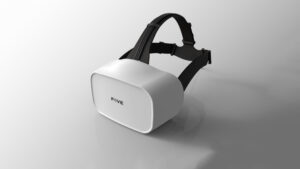 FOVE 0
Tracking uses DK2 technology, but they will soon migrate to Lighthouse. Visual quality seems on par with CV1.
Dynamic depth of field visual effect: useless. The pupils aren’t physically adapting to different depths anyway, and the effect is temporally smoothed (probably to prevent effect flickering), making the whole image feel blurry overall. Best turned off.
Foveated rendering (rendering lower quality wherever you are not directly looking at, to vastly improve framerates): works perfectly. I couldn’t notice any lag between gazing and the corresponding increase in detail. This is the future!
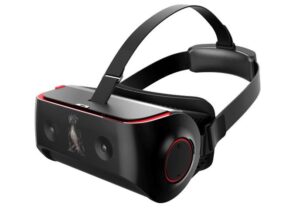 Qualcomm VR820 ref design
Visual bandwidth: unknown
Remarks: wireless with positional tracking, not going to be commercialized
The demo showed an octopus suspended in the air (water), moving up and down, and a completely flat blue background. This made it hard to judge the quality of its positional tracking.
 IdeaLens M1000
Visual bandwidth: 7680×4320 pixels @ 90Hz = 2985 megapixels/second
Remarks: huge FOV of 180º with an 8K screen
Huge headset for a huge FOV. The demo I tried showed real time streaming video from a nearby 360º camera. I suspect the video was pretty low resolution since image quality seemed on par with a CV1.
It packs a very wide set of lenses covering most of the inside, with one fresnel lense in front of each eye (similar in appearance to those in Vive, with big segments, rather than the thin ones in CV1), while the rest was filled with what seemed a regular lense design. The visual quality didn’t suffer much in those areas, I expected a much bigger drop in detail, but nope!
The rotational tracking was lagging a good 50-200ms, probably due to the stream being compressed server side and decoded on or near the headset. Couldn’t test positional tracking, I’m actually not sure if this headset even has it or not.
 IdeaLens K2
Remarks: self contained wireless device, 120º FOV
Visual quality was standard, the headset was surprinsingly comfortable to wear despite its weight. The slightly bigger field of view is nice, but the tunnel effect is still noticeable.
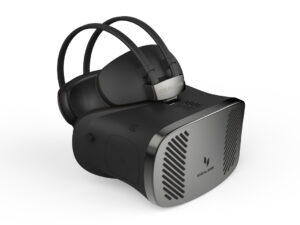
 Pico Neo
Another selft-contained VR system with smarpthone-like hardware and rotational tracking. Normal visual quality.
The computing hardware and battery is in a gamepad controller, that is wired to the headset in order to provide the image and receive the sensor data.
Review Oculus Rift CV1, comparación con DK2
Dos añazos han pasado desde mi ultima entrada en el blog, han pasado en un suspiro, vueltas que da la vida.
Al tema. Esta tarde me han llegado las Rift cuyo preorder hice en el minuto 55, allá por Enero. Santa paciencia. El tochamen que viene a continuación lo escribí rapidamente para unos foros, pero ha quedado tan largo que he pensado que sería una buena forma de resucitar el blog. Ahí va!
Bueno, esta tarde me ha llegado el mío. Voy a dar impresiones desde mi punto de vista de usuario de DK2 desde hace casi 2 años.
En general
Primera impresion: El packaging muy cuidado. A mi estas cosas de unboxings y demás me la soplan, pero no he podido evitar fijarme en lo bien que han cuidado todos los detalles, y eso quita el miedo de sentir “pa que hostias me he gastado ese dineral”, al contrario, piensas que lo ha valido. Viene hasta con pegatinas swag para que la gente que las vea en tu portatil sepa que eres alguien que mola y te pidan autógrafos.
A destacar: el sistema elástico para ponerse/quitarse las gafas, muy buena solucion, especialmente comparado con el del DK2 que era un engorro.
Tiene una tela elástica que evita que entre el polvo a la pantalla interior, cosa que era una preocupación con el DK2. Con el CV1 lo puedes dejar tirado en cualquier sitio sin andar preocupándote en qué posicion es mejor dejarlo para que no le entre el polvo luego.
El cable es una bendición: viene un HDMI y un USB3 de la torre, y a los 20cms se juntan en un solo cable, manteniendo el grosor del cable HDMI a solas, flipante. Se puede pisar sin preocupaciones (no recomendado, pero con el DK2 parecia que iban a enroscarse los cables internamente y acabar rompiendo a la larga), es tan flexible como en el DK2, y tiene una longitud que deja claro que Oculus no tiene pensado limitarse a una experiencia sentada.
Tracking: como acabo de decir, el cable tiene una longitud decente. He hecho pruebas en un espacio de 1.5m x 2m, y sin problemas, desde estar de pie hasta estar agachado en todo ese volumen. El unico problema es si te agachas “con la espalda” mirando hacia la esquina opuesta de la cámara: al haber ahora mismo solo una cámara, tapas el headset con tu espalda y pierde tracking. Pero si te agachas “con las rodillas” mantiene el tracking sin problemas. No he notado perdidas de precisión obvias hasta 2.5m de distancia.
Aparte, como el casco tiene menos inercia que en el DK2, puedes hacer movimientos mas bruscos sin que se te bailen las gafas de posición en la cabeza, por tanto aguanta más caña dando sensación de solidez.
Audio
El audio es muy bueno. No soy audiófilo pero tampoco me conformo con unos cascos cualquiera y me tiro horas y horas comparando antes de comprar unos. Los del rift son semiabiertos, no me han defraudado en absoluto, tienen una respuesta en graves bastante más que aceptable, dicen que de calidad son similares a unos cascos bien escogidos del rango de 100 euros (no cascos en los que pagues marca y diseño). Hay que destacar que el HRTF es una maravilla. En más de una ocasión he podido sentir perfectamente si un objeto estaba detras, delante, encima o debajo gracias a ello. Es similar a unos 5.1, pero con la diferencia de que el tema también funciona en vertical 🙂
Mandos
El mando de XBox no consigo que funcione el pincho wireless en windows 7. Por suerte ya tenia otro mando identico pero su cable gigantenorme, asi que ese estoy usando de momento para moverme por la habitación. Si algun dia windows update se digna a funcionar, se bajaran los drivers del wireless y lo usaré.
El otro, el minimando, es util para subir/bajar el volumen sin andar buscando el teclado, tiene incluso indicador de bateria en Oculus Home, y es perfecto para experiencias simples de poca interacción en las que no estes sentado frente al teclado. Otro de los motivos por los que creo que Oculus va a cambiar su postura de “seated experiences only”.
El elefante de la habitacion son los Touch, porque no están. Si los rumores son ciertos los veremos antes de fin de año, y van a caer 100% fijo dadas las buenas reviews que estan saliendo.
Imagen
Calidad visual: lo que todo el mundo se pregunta. El SDE (el espacio negro en pixeles adyacentes) esta practicamente solucionado. Si te pones a buscar lo encontrarás, pero en condiciones reales de uso, no se nota.
Queda por tanto el tema principal, la resolución. Se nota la mejora respecto a DK2, y yo creo que merece la pena el upgrade. Para haceros una idea, si poneis el DK2 con pixels per display pixel a 2x (osea, renderizando a más de 4k), entonces el CV1 se ve en toda la pantalla algo mejor que el DK2 en el centro de sus lentes. Si al CV1 le poneis el p/dp a 2x ya la diferencia es clara.
Si alguno le da al Elite Dangerous, con el CV1 se pueden leer absolutamente todos los textos sin tener que inclinarse para verlos más cercanos.
Las lentes estan bien, tienen mas o menos el doble de área de enfoque que en el DK2. Su forma no-circular ayuda a darte más espacio para no chocar con la nariz (el DK2 acaba tocandome las narices con sus amplias lentes, tanto literal como figurativamente), y el ajuste de IPD es muy comodo de usar, modificable al vuelo en cualquier momento desde el menú de Oculus (por si andas haciendo demos al personal y quieres que lo vean perfecto).
Respecto a lo de que sea lentes fresnel hibrida o no, lo unico en que se nota es en los dichosos rayos de dios (god rays). Por si alguien no los conoce, se rata de unos rayos de luz (muy difuminados, eso sí), que parten desde los pixeles más luminosos hacia el exterior de la lente (de forma radial, desde el centro de la lente, para entendernos). Algunos dicen que solo se nota en escenas de alto contraste. Yo lo noto tambien en situaciones de contraste medio-alto. Por ejemplo, el lado a la sombra de un arbol, contrastando con un cielo azul de fondo. Tal vez me acabe acostumbrando y lo acabe ignorando inconscientemente (seguramente si), pero tras 2 horas de uso son claramente visibles y tocan un poco las pelotas. Pero nada grave, simplemente soy un poco quisquilloso.
La diferencia entre 60Hz con alta persistencia y 75Hz con baja persistencia en el DK2 era apreciable. La diferencia entre los 75Hz del DK2 a los 90Hz del CV1 yo sinceramente no la noto de forma directa. Lo que si que creo es que contribuye a la famosa “presencia”. Con el DK2 he tenido muy muy pocos momentos de presencia (de esto que te da por sacar la mano a intentar coger o mover algo, o a apartarte para esquivar un objeto), pero con el CV1 ya he tenido un par en el día de hoy. La escena del T-rex del dreamdeck ha sido una de ellas. Estoy seguro de que el audio con HRTF tambien ha contribuido a ello.
-fútbol +carreras
Ahora voy con el uso en simracing, que es el mayor uso que le doy. En concreto probado con Assetto Corsa. Si con DK2 cuestra leer el tacómetro y demás (hay que acercar un poco la cabeza para poder leer los numeritos), en el CV1 se leen sin tener que acercarse. Los menues se pueden leer todos sin moverte, los textos mas pequeños no estan tan nitidos, pero son legibles, por poco. Ahora, si habilitas el pixel per display pixel poniendolo a 1.4x, la diferencia es clara. Para mi ese es el punto en el que las CV1 me parece “suficiente” sin lugar a dudas para juegos de coches. SI lo subes a 2.0x la cosa mejora algo más, pero en mi equipo en concreto (gtx970) no consigo renderizar esa resolucion de más de 4k a 90fps, me quedo en entre 60 y 90fps segun el circuito y los coches que haya. El que tenga pepinos de la serie 1000, que lo pongan a 2x y disfruten.
Otra cosa que si que se aprecia claramente aqui son los 90Hz cuando miras por los cristales laterales del coche a velocidad. Se ve pasar el paisaje con mas nitidez que en DK2. Entre la resolucion extra, el SDE arreglado, y los 15Hz extra, es algo que se puede notar.
Mirando hacia adelante esos Hz extra no son apreciables conscientemente, pero inconscientemente ayuda a asentar el mundo virtual y que parezca todo más realista, más “estoy ahí metido de verdad” de presencia esporádica, comparado con el DK2. Yo al menos lo noto bastante.
Deberia escribir un libro. Perdon por el tocho pero seguro que a alguno le ayuda para decidirse 🙂
Hasta ahi llega la review tras 3 horas de uso. Ahora toca plantearse si vendo el DK2 o lo conservo de recuerdo.
Presentación GIT & GIT-SVN
Aprovechando la coyuntura, publico también unas transpas de una charla que dimos hace mil en la oficina, esta vez en spanish. Estaba orientado a novatos totales del git, pero familiarizados con svn:
07.5.14Grokking Git in 8 slides (for svn users)
Made this at work, it’s how I would have liked to learn Git when I started toying with it some years ago.
Note that not a single Git command is explained. Instead, a series of images show how Git works, and what’s possible to do with it.
Looking up the actual (and unintuitive) commands and flags is left as an exercise to the reader 🙂
IMPORTANT: the presentation notes are only visible in the original Grokking Git presentation (bottom panel, right below each slide), but here’s an embedded version anyway, for those too lazy to click the link:
02.1.14Hacking the LGA 775 socket
Hello, and welcome to CPU Dealers!
In todays episode we’re going to learn how to fit an LGA771 CPU into an LGA775 motherboard with no brute force!
Motivation
So why on earth would anyone decide to put an LGA771 Xeon server cpu into a domestic LGA775 motherboard, you may ask?
Welp, because it’s fun and you get to learn stuff, thats why!
Traditional motivation: Money
However, the usual argument is that, if you are planning a modest upgrade for your shitty old LGA775 system, not needing the latest and greatest, you can save some money this way. See, there’s lots of Xeon processors in the market right now, and they are all dirt cheap. The interesting thing is that most LGA775 CPUs have Xeons equivalents:

The Xeon I chose, an E5440 SLBBJ. Same speed as a Q9550, but requires less juice, so has a lower TDP. Source: here and there.
Some people argue that Intel simply bins Xeons better than the consumer counterparts, so while being essentially the same CPU, the Xeons are more reliable, run colder, and are harder, better, faster, stronger.
The LGA775 market, on the other hand, is filled with pretty expensive CPUs. They’re all usually priced 30€ to 150€ higher than the server versions: Xeons are definitely the best bang for the buck. So the plan usually is:
- Upgrade your system to a Xeon instead of a domestic CPU.
- …
- Fun and profit!
Side motivation: Overclocking
Some people take advantage of the lower voltages required by Xeons, and choose them not only because they’re cheaper, but because it’s in theory easier to squeeze a bit more speed out of them.
Keeping that in mind, I chose an E0 stepping (later revisions usually lower power requirements of the CPU). Unfortunately, my SLBBJ unit was already running pretty hot at stock voltages and clocks, so I’m leaving it alone for the time being.
Background
LGA775 (codenamed Socket T) was introduced by Intel around mid-2004, and used in domestic motherboards. The most popular CPUs running those LGAs are now Core2Duos and Core2Quads.
A year and a half later, in 2006, Intel introduced LGA771, a very similar LGA intended for use in multiprocessor server motherboards, and which can host Intel Xeon processors.
Looking at the official datasheets released by Intel (page 41 here and page 52 here) , we can check the pinouts of both LGAs, and spot their differences:
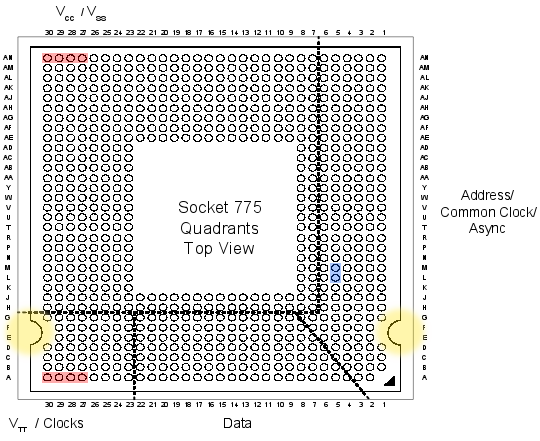
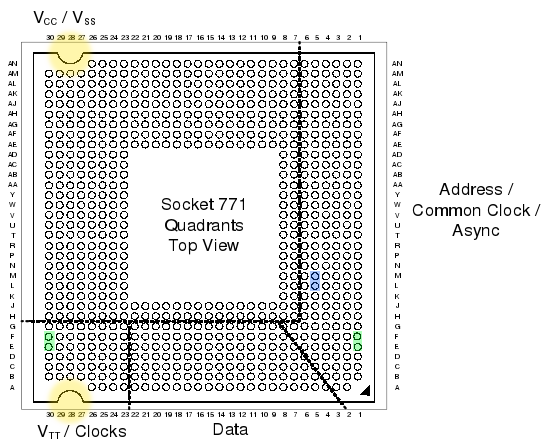
If we checked the socket pin assignment one by one, we could see that there’s 76 different pins in total. But most of them are irrelevant (reserved for future uses, etc), they pose no problem for our conversion mod, so we’re left wondering about the colored pins:
- Red: 8 pins only used in LGA775.
- Green: 4 pins only used in LGA771.
The red and green pins are all power pins (VCC, VSS at the top, and VTT at the bottom). There’s hundreds more of them in the LGA, so I’m sure our new CPU won’t mind if we remove just these few.
- Blue: 2 pins that have different purposes in each LGA.
These pins (L5 and M5) serve different purposes in LGA775 than in LGA771. And this time they are important pins (one of them is the Execute BIST pin, Built-In Selft Test, needed to boot). Fortunately, Intel had simply swapped their places in the newer 771 LGA! So it should be relatively easy to re-wire them.
- Yellow: not a pin, just highlighting the different shapes 🙂
These differing yellow shapes can be a problem, since the CPUs from one LGA will not physically fit in the other LGA without some hardware modifications. We’ll get to this later on.
Uh, in case you’re wondering, I did not personally go over all the pin specifications one by one. But this guy did.
Motherboard support
In most cases, the CPU will run as-is. This was the case of my 965P-DS3 motherboard.
Sometimes, you may need to manually patch your BIOS, adding the microcode of your specific Xeon model to the internal “whitelist” (so to speak). Additionally, this usually forces your mobo to acknowledge that your Xeon CPU implements the SSE4 instruction set (which can give an extra speed boost in some applications).

I didn’t patch my BIOS just yet… so instead, I decided to steal this screenshot from Google Images. Sue me.
And in a few rare cases, your motherboard will directly refuse to boot the new CPU, regardless of any BIOS patching you may attempt. In that case, you’re out of luck.
Before attempting to transform your LGA775, search the web and check if your chipset will be happy with a Xeon CPU.
In any case, bear in mind that your mobo needs to support the speeds that your specific Xeon choice requires: voltage, FSB speeds, etc. Otherwise you’ll have to resort to underclocking the CPU (sad), or to overclocking your motherboard/ram (yay! but not recommended).
Procedure
First, open your tower, remove the heatsink, then the CPU:

There lies my old Core2Duo E4300, overclocked to hell, ready for retirement.
Now we do what the title says: we hack the LGA775 socket. Literally.
Yes, take a sharp knife or a cutter, and prepare to slash some plastic. The exact bits you have to cut off are the ones colored yellow in the LGA775 pinout diagram (scroll back to the beginning of this post). It should end up looking something like this:

Actually, please try to aim for cleaner cuts than the mess you see in this photo.
The motherboard is ready!
Now we need to hack the Xeon CPU itself. Remember the blue pins that had switched places in LGA771? It’s time to revert what Intel did, and get a 775-compatible pinout layout.
If you’re good enough you could try to swap them yourself, using whatever technique you come up with. But the rest of us mortals will resort to buying a ready to use swapper sticker. Search for “775 771 mod” in ebay, play safe and buy several of them, just in case you break one in the process:

Be very careful with the sticker, it’s very easy to break its internal wiring.
So there’s that. Now we simply have to put the Xeon in the LGA, add thermal paste, heatsink, etc:

Yay, we’re done!
Finally, plug the PSU, pray to Flying Spaghetti Monster, and boot the system!
Results
Here’s a nice comparison graph of the results. The contenders are:
- A Core2Duo E4300 (LGA775), at speeds ranging from 1.8GHz (stock) up to 3.01GHz (overclocked).
- A Xeon E5440 (LGA771), at stock speed (2.83GHz).
The benchmarks are:
- Assetto Corsa, a multithreaded racing simulator (M30 Gr.A Special Event), FPS measured with my own plugin FramerateWatcher.
- PI calculator SuperPI, 2M variant, running in a single thread.
- Average maximum temperature reached by all cores, over a period of 15 minutes running In-place large FFTs torture test in Prime95.

And the winner is…
The winner is the Xeon, as it should: specially in multithreaded programs, the Xeon obliterates the Core2Duo.
But it’s interesting to note that, even running at the same clock speed of around 2.8GHz, the Xeon outperforms the Core2Duo by more than 20% in single threaded applications.
I checked the FSB and RAM multipliers in both cases, just in case the Xeon had an advantage on that front, but it was actually the E4300 which had higher FSB and RAM clocks!
Goes to show how clock isn’t everything when it comes to performance, and obviously better CPU technology consists of more than higher clock freq and greater number of cores.
The end
So that’s it, that’s the story of how I more than doubled the framerates in games and halved compilation times for the cost of 4 movie tickets.
Hope you enjoyed reading this article as much as I definitely did not enjoy proof-reading it! 😉
08.7.13In defense of unformatted source code – breakindent for vim
Everyone knows that Opera is better than Firefox, Vim+Bash is better than any IDE, and 4-space indenting is better than tabulators. Having established those undisputed facts of life, let’s revisit some common fuel for flame wars: the mighty 80 character line limit.

Fortran code punched into a 80 x 10 IBM Card from 1928
Some people propose 80 chars, others 79, 100, 120, 132 , and many values in between.
Some people propose it should be a soft limit (meaning you can freely ignore in rare cases), while others set pre-commit hooks to stop any infringing line from reaching repositories.
None of this really matters.
The 80 character line limit, originated by hardware limits back when computer terminals were only 80 chars wide, or even further back in time, is said to provide many advantages. To name a few:
- Better readability when opening two files side by side (for example, a diff)
- Quicker to read (same reason why newspapers use many columns of text, instead of page-wide paragraphs: human brain scans text faster that way).
- It forces you to extract code into separate functions, in order to avoid too many nesting levels.
- It prevents you from choosing overly long symbol names, which hurt readability.
- Etc.
I propose that those advantages are real and desirable, but should not be achieved through arbitrary line length limits. On the contrary, I propose that coders should not waste time formatting their source code: their tools should do it when possible. After all, we use text editors, not word processors! The problem is that, unfortunately, most text editors are too dumb.
Fix the editors, and you fix the need for line length limits.
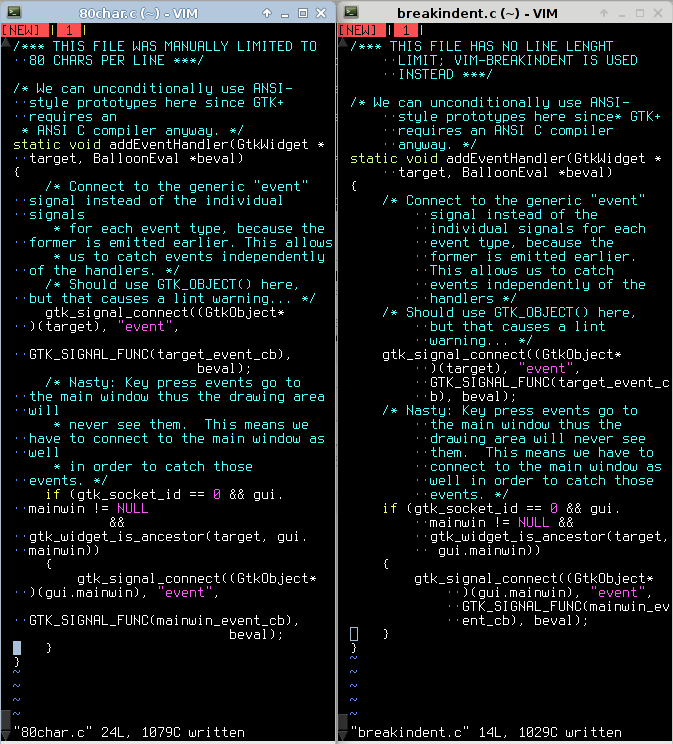
If you edit your code in vim, you’re in luck, thanks to the Breakindent functionality. Here’s some side-by-side comparisons of 80-char line limit vs. unformatted text with BreakIndent enabled:
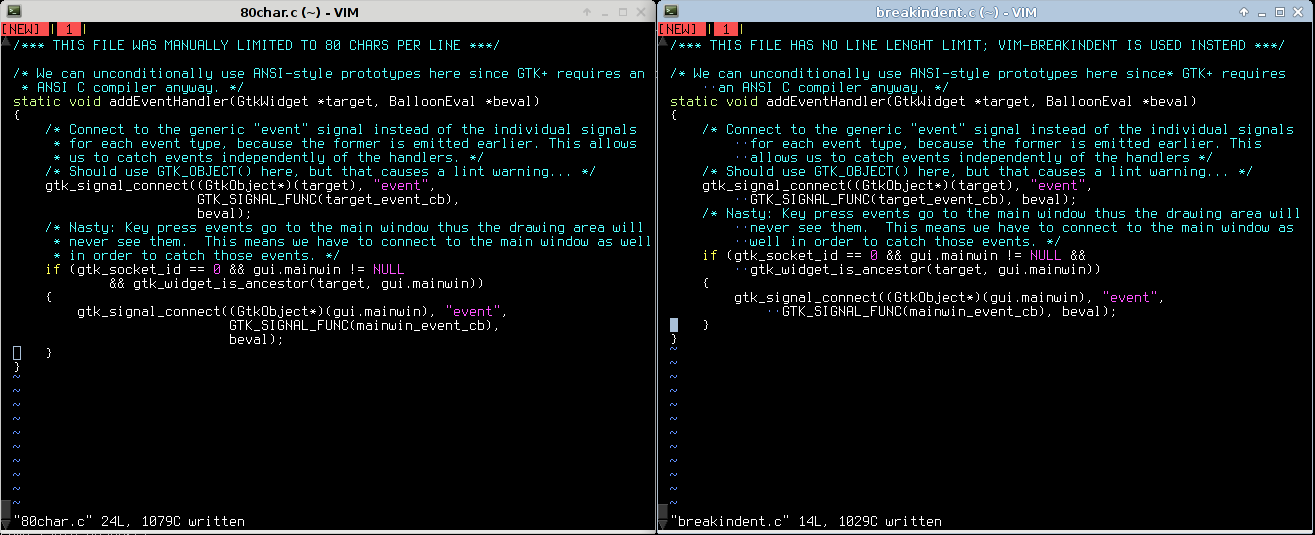
(left: 80-char right: breakindent)
Traditional terminal size:
Resizing your terminal to exactly 80 chars wide, both cases look pretty similar. Nothing to see here, move along.

(top: 80-char bottom: breakindent)
Wide terminal:
If you want to edit just one file, an 80-char limit will waste the rightmost half of your screen (or more).
(left: 80-char right: breakindent)
Narrow terminal:
If you’re three-way merging (or need to keep code aside for a moment, etc) those 80 chars will either wrap around or disappear from view, making the code harder to read.
All in all: when compared to an editor featuring smart indenting, the 80-char lines artificially limit how you can resize your own windows, with no appreciable gain, and in most cases forcing you to waste many pixels of your carefully chosen 27″ dual-screen coding setup.
05.17.13Trick of the day: rendering graphics in your terminal
“Those who cannot remember the past are condemned to repeat it”
— Jorge Agustín Nicolás Ruiz de Santayana y Borrás

Over the past few years, a number of “graphic terminal” emulator software have emerged. Some examples:
This is nothing new, in fact it was possible back in the 70’s, and you can try it using XTerm, the default terminal emulator bundled with X installations since forever!
The process is very simple, you simply have to run:
$ xterm -t -tn tek4014
Which will start an xterm emulating a TEK4014 terminal (instead of the default VTxxx plain-text terminal).

TEK4010 terminal
Now we’ll download some images we want to display. These 40 year old terminals don’t support JPEG though (it didn’t exist back then), nor any popular modern image format, so we’ll have to provide images in a format they understand. Plotutils includes a couple of these vectorial images, so we will run:
# apt-get install plotutils
And finally it’s simply a matter of feeding the Tek4014 terminal with an image, for example:
$ zcat /usr/share/doc/plotutils/tek2plot/dmerc.tek.gz
The terminal will be fed with an appropriate escape character sequence, along with the actual image contents, it’ll interpret it as an image (just like other escape sequences are interpreted as colored or underlined text), and the awesome result will be this:

How cool is that? 🙂
You can even resize the terminal window, and the graphics will be re-rendered with the correct size (remember it’s a vectorial image, so wen can zoom in indefinitely).
01.31.13
Helpful VIM highlighting
Here’s a quick snippet that you can add to your .vimrc in order to get:
- MS Visual Studio-like ‘current word‘ highlighting.
- Trailing space highlighting.
The result looks like this:
And the code is:
function Matches()
    highlight curword ctermbg=white ctermfg=black cterm=bold gui=bold guibg=darkgrey
    try
        call matchdelete(w:lastmatch)
        unlet w:lastmatch
    catch
    endtry
    silent! let w:lastmatch=matchadd ('curword', printf('\V\<%s\>', escape(expand(''), '/\')), -1)
    highlight eolspace ctermbg=red guibg=red
    2match eolspace /\s\+$/
endfunction
au CursorMoved * exe 'call Matches()'
Yes, one day I might convert it to a vim plugin, meanwhile just copy-paste to your .vimrc.
Enjoy!

